

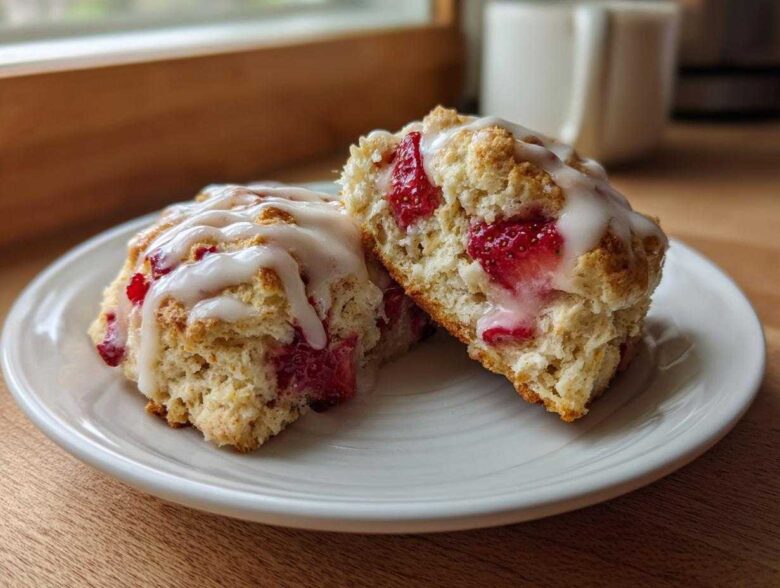
If you think scones are fussy or dry, I am about to change your entire morning routine! Seriously, forget those hockey puck looking things people call scones. When I want a true breakfast pastry that melts in your mouth, this is what I bake. The secret weapon here is using real, cold heavy cream—it makes such a difference in the final texture. You can actually find some of my other favorite breakfast recipes right here on the blog!
We fold in gallons of fresh, sweet strawberries and crown the whole thing with a bright vanilla glaze. This recipe for Strawberry Cream Scones with Vanilla Glaze is my absolute go-to when I’m hosting brunch; everyone raves about how light they are, and honestly, they are embarrassingly easy to make. I’ve made this dozens of times, and I promise it’s foolproof if you follow my main rule: keep everything cold!

Why You Will Love This Strawberry Cream Scones with Vanilla Glaze Recipe
Seriously, these scones hit every single note you want in a perfect morning treat. If you’ve ever been disappointed by a tough, crumbly scone before, that won’t happen here. Trust me on this one!
- The texture is unbelievably tender! That’s the magic of using heavy cream instead of milk—it makes them feel rich without being heavy.
- They are packed with real flavor, thanks to those vibrant, sweet chunks of fresh strawberry throughout the dough.
- The simple homemade vanilla glaze sets up beautifully, adding that perfect little sugary crunch on top.
- This whole batch comes together faster than you think. They’re ideal for a weekend bake when you want something fancy without a full day commitment.
- You get beautiful, perfectly golden tops because we brush them with a little extra cream before baking!
- This recipe makes the absolute best Strawberry Cream Scones with Vanilla Glaze—they taste like they came from a fancy bakery!
Essential Ingredients for Perfect Strawberry Cream Scones with Vanilla Glaze
Okay, let’s talk about what goes into these beauties. Getting these ratios right is key to achieving that melt-in-your-mouth texture. Remember, the colder these ingredients are when they hit the bowl, the flakier your final product will be! It’s the backbone of the whole tender scone technique.
I always keep my cream and butter tucked away in the coldest part of the fridge right up until I need them. If you’re making the vanilla glaze, you can check out my main guide for that fluffy vanilla frosting here, though this scone glaze is much simpler!
Here’s the lineup for about 8 glorious scones:
- 2 cups all-purpose flour – The standard workhorse, nothing fancy needed here.
- 1/4 cup granulated sugar – Just enough sweetness, but not so much that it stops them from browning nicely.
- 1 tablespoon baking powder – This is our lift! Don’t try to skimp on this or they’ll be dense bricks.
- 1/2 teaspoon salt – Essential for balancing out the sweetness.
- 1/2 cup (1 stick) cold unsalted butter, cut into small cubes – Must be icy cold, I swear!
- 3/4 cup heavy cream, chilled – This is the star liquid ingredient for richness.
- 2 tablespoons heavy cream, reserved for brushing – For that gorgeous, shiny, golden crust.
- 1 large egg – Just one is all it takes to bind things together nicely.
- 1 teaspoon vanilla extract – A little background warmth in the scone itself.
- 3/4 cup fresh strawberries, hulled and chopped – Make sure they are chopped into manageable little pieces.
- 1 cup powdered sugar (for glaze) – Sift this if it’s lumpy, trust me!
- 2 tablespoons milk or cream (for glaze) – This adjusts the drizzle consistency.
- 1/2 teaspoon vanilla extract (for glaze) – For that extra punch of vanilla flavor on top!
Get your ingredients ready and make sure they are nice and cold before you start combining. That cold butter melting slowly in the oven creates all those lovely flaky layers we are looking for!
Step-by-Step Guide to Making Fluffy Scones from Scratch
This is where the fun begins, but also where you have to be firm with yourself—we are not making bread here! We want tender, flaky layers, and that means working quickly and gently. If you’ve got your oven warmed up to 400°F (200°C) and your baking sheet lined with parchment paper, we can dive right in. Remember, minimal handling is the secret to the tender scone technique!
Preparing the Dough and Cutting the Strawberry Cream Scones
First up, grab your biggest mixing bowl. Whisk together all your dry stuff: the flour, the sugar, the baking powder, and the salt. Then, toss in those little cubes of ice-cold butter. I prefer using my fingertips for this part—just rub the butter into the flour until it looks like coarse crumbs. You absolutely must leave some bits the size of small peas! Those little butter pockets are what steam up in the oven and create those gorgeous flakes.
Next step is the wet stuff. In a separate, smaller bowl, whisk up that 3/4 cup of ice-cold heavy cream with the egg and the teaspoon of vanilla extract. Pour this liquid mixture right into your butter-flour mix. Now, mix it—and I mean *gently*—with just a fork until it barely comes together. It should look sad and shaggy, not smooth! Seriously, stop mixing when you still see those dry streaks. That’s your cue!
Finally, gently fold in the chopped fresh strawberries. Do this quickly, just enough to distribute them. Turn that messy, shaggy dough out onto a surface dusted lightly with flour. Resist the urge to knead! Just pat it down firmly with your hands until it’s about 3/4-inch thick. Think of it like tucking it in for a nap, don’t work it over!
Once it’s patted out, use your bench scraper or a sharp knife to cut it into 8 wedges. Don’t saw back and forth like you’re cutting wood; press straight down for a cleaner edge. Arrange them on your parchment-lined sheet, making sure they aren’t quite touching.
Baking and Cooling the Homemade Scones with Fresh Strawberries
Before they hit the oven, we give them a little spa treatment. Brush the tops of all those wedge beauties with the reserved 2 tablespoons of heavy cream. This is what gives you that beautiful, deep golden-brown color you see in the pictures!

Pop them into that hot 400°F oven. They bake for just 15 to 18 minutes. You’ll know they are done when they look golden brown on top and sound hollow if you tap the bottom. Pull them out and let them cool completely on a wire rack. This is crucial—if you glaze them warm, that pretty vanilla glaze will just melt into a puddle everywhere!
Once they are fully cool, we move on to the final, glorious step—the glaze! Keep going; you’re almost done making these amazing homemade scones with fresh strawberries.
Creating the Perfect Vanilla Glaze for Scones
When the scones are completely cool—and I mean totally room temperature—it’s time for the grand finale! People often mess up the glaze because they make it too thin, or conversely, they make it so thick you have to chip it off with a knife. We want that perfect, sweet, slightly tart coating that drizzles beautifully and sets up just right!
This is the easiest part of the whole process, but you have to pay attention to consistency. We’re aiming for a pourable, but not watery, coating. If you want to see how I make a glaze that hardens nicely for other treats, you can check out my guide on cookie icing recipes here, but this one is meant to stay a touch softer, which is best for these strawberry cream scones with vanilla glaze.
Here’s the super swift method for the vanilla glaze for scones:
- Start with your cup of powdered sugar in a small bowl.
- Add the 1/2 teaspoon of vanilla extract right away.
- Now, slowly start adding the 2 tablespoons of milk or cream. Add just a tiny splash at first, whisking hard.
You’re looking for a texture where it drizzles easily off your whisk, but you should still see the lines of glaze sitting on top of the bowl for a second before they melt back in. If it looks like it’s falling off the whisk too fast and pooling immediately, you need a little more powdered sugar—a tablespoon at a time works best!
Have fun with the drizzle! I usually just use a spoon and flick it back and forth over the cooled scones. Don’t worry about making it look perfect; that rustic, slightly uneven look is half the charm for homemade pastries! Let it set up for about 15 or 20 minutes while you get the coffee ready, and then dig in!
Tips for Achieving Tender Scone Technique in Your Strawberry Cream Scones
I know I keep harping on this, but if you want those bakery-worthy, tender scones, you have to respect the dough. It’s not like cookie dough or cake batter; it rebels if you treat it roughly! This tender scone technique relies on physics, seriously. We are aiming to keep the gluten development to an absolute minimum.
The number one rule? Keep. Everything. Cold. That cold butter I told you to cube? If it starts warming up when you’re cutting it into the flour, it melts into the flour instead of staying separate. When it melts, you lose those precious little pockets that turn into steam when they hit the oven, and steam equals flaky layers. That’s why I sometimes put my flour/butter mix back in the freezer for five minutes if my kitchen is super warm!
We talked about this in the instruction phase, but I need you to hear me out on the *why* behind not overmixing. If you stir or knead that dough too much—even after you add the cream—you are activating the gluten in the flour. Gluten is what makes bread chewy and strong. We want the opposite: a delicate crumb. So, mix until it *just* holds together, and let those streaks of flour remain. That’s fine! They get incorporated with gentle patting.
Another pro tip specifically for the strawberries: If you happen to use frozen ones—maybe you grabbed them last minute—you have to coat them first. Toss those frozen berries gently in about one teaspoon of your measured flour before folding them in. This tiny coating acts like a shield, stopping excess moisture from bleeding out all over your dry mix and making the whole dough sticky and tough. This is one of those little things that separates good cookies from *great* cookies, and it’s vital for our Strawberry Cream Scones with Vanilla Glaze.

If you want to read more about how using high-fat dairy like heavy cream affects texture, check out my thoughts on when to use cream in baking. It really is a game-changer for achieving that rich, tender result in these scones!
Ingredient Notes and Substitutions for Best Cream Scones
So, what if you open your fridge for this recipe and realize you’re fresh out of that nice, thick heavy cream? Don’t panic! It happens to me all the time. The good news is that these scones are super forgiving, but we do need to talk substitution because the fat content really matters for the texture we are chasing.
Heavy cream is king here because its high fat content keeps the scones tender and rich, even when handled a bit. However, if you only have whole milk, try cutting it with a tablespoon of melted butter per 1/2 cup of milk, but you’ll need to work even faster mixing, okay?
Can I use buttermilk instead of heavy cream?
Yes, you absolutely can use buttermilk! In fact, buttermilk gives you a slightly different, tangier flavor that pairs beautifully with the strawberries. Buttermilk is naturally acidic, and it reacts with the baking powder differently than regular cream does, sometimes leading to a slightly softer lift.
If you swap the 3/4 cup of heavy cream for buttermilk, you need to be *extra* careful about mixing time. Buttermilk can toughen those gluten strands super fast, so stir it in with the lightest touch possible. You’ll get a truly fantastic scone, maybe a little less rich, but wonderfully bright!
If you love the tang buttermilk brings to baking, you should definitely take a peek at my moist buttermilk cornbread recipe; it uses that same principle of acid magic!
What happens if I use margarine instead of butter?
Oh, dear, I try to avoid this one myself! Butter is crucial because it’s solid fat. When you cut the cold butter into the flour, those solid chunks create steam pockets we talked about earlier. Margarine or vegetable shortening often has a much lower melting point, meaning they can melt into the flour before they even hit the oven. If you absolutely have to substitute, use a high-quality stick margarine—the kind that comes in foil sticks—and ensure it is rock hard straight from the freezer. But for the absolute best cream scones, stick with real butter!
Do I have to use fresh strawberries?
For the very best flavor and texture, fresh is always my recommendation, especially since we are using them raw in the dough. Fresh berries burst with juice and flavor during baking without making the dough soggy.
If you only have frozen strawberries on hand, don’t sweat it! Just make sure you toss those frozen berries with about one teaspoon of your measured flour before you gently fold them into the shaggy dough. This coating keeps the excess moisture away from the flour mixture until they bake. It’s a small step that prevents those unfortunate pale, wet patches in your final baked good!
Serving Suggestions for Your Strawberry Cream Scones with Vanilla Glaze
Once your beautiful Strawberry Cream Scones with Vanilla Glaze have cooled and the glaze has set, the real fun begins—eating them! These aren’t just for a quick grab-and-go breakfast, although they certainly work for that. They are truly best enjoyed when you can sit down and savor them.
Because they are already sweet and rich thanks to that heavy cream, you don’t need a ton of fussy additions. But if you’re setting up a beautiful spread for brunch or aiming for that perfect afternoon tea vibe, here are a few of my favorite pairings:
- Simply Lovely: Honestly, they are fantastic all on their own. The vanilla glaze is supposed to be the main event!
- For Brunch Makers: If you’ve whipped up a huge spread, serve these alongside something slightly savory to balance the sweetness. My famous easy French toast casserole is a perfect counterpart for a big weekend breakfast.
- Afternoon Tea Style: Serve them slightly warmed with a small side of clotted cream or a dollop of good quality lemon curd. The tanginess of the curd cuts right through the richness of the cream in the scone base. Don’t forget the tea!
- Elevated Fruit: If you happen to have extra fresh strawberries hanging around, serve a small bowl of sliced berries mixed with maybe a tiny drizzle of honey alongside the scones. It just emphasizes that fresh flavor.

They are sturdy enough to be a main feature on a platter for any baking for brunch event. Everyone loves a delicious sweet pastry that doesn’t require silverware!
Storage and Reheating Instructions for Glazed Baked Goods
So, you’ve made a stunning batch of Strawberry Cream Scones with Vanilla Glaze, and now you have leftovers—lucky you! The real question is how to keep them tasting fresh when you want one the next day. Handling the storage is slightly different depending on whether the glaze is on or off, so pay attention here!
Storing Scones Before Glazing
If you baked them but decided to wait until the next morning to apply that gorgeous vanilla icing—smart move! Unglazed scones are much easier to store long-term. You can simply keep them in an airtight container at room temperature for about two days. I give them a little nudge toward the third day before I worry about them drying out too much.
If you need them to last longer, up to a month, freezing is your best bet. Wrap each individual scone tightly in plastic wrap, and then place them all together in a heavy-duty freezer bag. Make sure you label the bag with the date!
Storing Scones That Are Already Glazed
This is where it gets tricky because the glaze is hygroscopic, meaning it pulls moisture from the air, which can make it sticky or weepy if stored improperly. If you’ve already drizzled that lovely vanilla glaze for scones on top, they really should be eaten within 24 hours.
Keep them in a single layer in an airtight container, but maybe try to separate layers with a piece of parchment paper, just to prevent the glaze from sticking to the scones above it. I definitely wouldn’t store glazed scones in the fridge unless your kitchen is bakingly hot; the cold can sometimes make the cake base a little dull.
How to Refresh Your Homemade Scones
If you refrigerated your unglazed scones or pulled one straight from the freezer, you need to wake it up! If you skip this step, they’ll taste dense, and we definitely don’t want that. Remember, these are wonderful glazed baked goods when fresh, and we want to recapture that magic.
The oven is your friend for reheating. Wrap the scone loosely in a tiny piece of foil—just enough to keep it from drying out on the edges—and warm it in a toaster oven or regular oven set to about 300°F (150°C) for about five to seven minutes. You want them warm all the way through, but not hot enough to melt the glaze if you’ve already applied it!
If you’re just warming up a frozen scone, give it about 10 to 12 minutes in the foil. If it was unglazed, toss it under the broiler for 30 seconds after warming if you want that nice crispy top again. Enjoy!
Frequently Asked Questions About Strawberry Scones Recipe
Okay, I know you’re going to have some questions because baking scones is one of those things where technique matters so much! I’ve tried to cover all the tricky spots in the recipe above, but here are a few things readers ask me most often when they are tackling their own batch of Strawberry Cream Scones with Vanilla Glaze.
Can I use frozen strawberries in this Strawberry Cream Scones with Vanilla Glaze recipe?
That’s a super common question, especially if you’re craving these in the middle of winter! Yes, you totally can use frozen strawberries. The major thing to remember is a two-step process: First, absolutely do not thaw them! Keep them rock hard. Second, before you fold them into your shaggy dough, toss those frozen berries with about one teaspoon of your measured flour. This little dusting prevents them from weeping too much moisture into the dough, which is what causes tough or gummy spots in your delicious Strawberry Cream Scones with Vanilla Glaze.
How do I make the glaze thinner or thicker?
This all comes down to the ratio of liquid to powdered sugar, which is highly customizable based on how humid it is inside your kitchen that day! If your Vanilla glaze for scones looks way too thick—and I mean, it’s barely moving off the spoon—just whisk in more liquid, one half-teaspoon at a time. Use milk or cream, whichever you used before. Go slow, though, because once it thins out, it’s hard to bring it back!
Now, if you went too far and the mixture looks thin, milky, or like watery paint, you need to add more powdered sugar. Add it in tablespoon increments, whisking well after each addition until you reach that perfect drizzly consistency—that point where it flows slowly but still holds a bit of itself together when dropped back into the bowl.
What is the best way to cut scones without squishing them?
This is the enemy of the tender scone technique! When you cut the wedges, or if you use a round cutter, you have to remember: Push straight down, and then lift straight up. Do not twist or saw back and forth! Twisting or sawing drags the top layer of dough across the bottom layer, sealing the edges together and completely squishing all those precious air pockets we worked so hard to create by keeping the butter cold.
Use a very sharp knife or a bench scraper and press firmly down in one motion. They cut much easier if they’re chilled when you go to slice them, too. If you’re using a biscuit cutter, give the cutter a quick spray of baking non-stick spray first!
If you’re loving these ideas, you can look at some of my tips for fluffy strawberry muffins next, since you clearly love those berries!
Estimated Nutritional Information for This Recipe
Now, I always say this upfront: please take these numbers with a massive grain of salt! I’m a baker, not a nutritionist, so these figures are just my best guess based on the standard ingredients I use for this Strawberry Cream Scones with Vanilla Glaze recipe.
I’m listing them here mainly so you can get a general idea, but they can vary wildly depending on the exact brands of heavy cream or sugar you end up using. If you’re counting macros super strictly, you might want to plug the exact items you used into one of those online calculators!
This estimation is based on the recipe yielding 8 standard servings:
- Serving Size: 1 scone
- Calories: About 320 (Wow, that heavy cream adds up!)
- Sugar: Around 18 grams
- Fat: Roughly 16 grams (Remember, a good amount of this is from that glorious cold butter!)
- Saturated Fat: About 10 grams
- Carbohydrates: Close to 40 grams
- Protein: 5 grams
- Sodium: 210mg
Don’t let the numbers scare you; these are made with real ingredients, and they are worth every single calorie when you bite into that tender crumb with the sweet vanilla glaze dripping down!
Share Your Experience Making These Sweet Scones
And that’s it, my friends! You’ve officially made a batch of my favorite breakfast pastry! I truly hope these Strawberry Cream Scones with Vanilla Glaze bring a little bit of sunshine to your kitchen table. Making them is half the fun, but seeing how they turn out for you is the best part for me!
I spend so much time perfecting these recipes, and knowing they work out for you means the world. So please, when you make them, don’t be shy!
- Leave me a comment down below! Tell me how you liked the texture. Did the glaze set perfectly? Did you add anything extra? I read every single one, I promise.
- If you loved this recipe and want to see more new treats, make sure you hang out with us over on the main blog page for fresh updates!
- And if you snap a picture of your beautiful, flaky scones—especially after you’ve drizzled that vanilla glaze—tag me on social media! I absolutely love featuring reader photos.
Baking should be joyful, and sharing the results just doubles the joy. Happy baking, and talk to you soon!
PrintStrawberry Cream Scones with Vanilla Glaze

A recipe for tender, sweet scones made with fresh strawberries and heavy cream, finished with a simple vanilla glaze.
- Prep Time: 20 min
- Cook Time: 18 min
- Total Time: 38 min
- Yield: 8 servings
- Category: Breakfast
- Method: Baking
- Cuisine: American
- Diet: Vegetarian
Ingredients
- 2 cups all-purpose flour
- 1/4 cup granulated sugar
- 1 tablespoon baking powder
- 1/2 teaspoon salt
- 1/2 cup (1 stick) cold unsalted butter, cut into small cubes
- 3/4 cup heavy cream, chilled, plus 2 tablespoons for brushing
- 1 large egg
- 1 teaspoon vanilla extract
- 3/4 cup fresh strawberries, hulled and chopped
- 1 cup powdered sugar (for glaze)
- 2 tablespoons milk or cream (for glaze)
- 1/2 teaspoon vanilla extract (for glaze)
Instructions
- Preheat your oven to 400°F (200°C). Line a baking sheet with parchment paper.
- In a large bowl, whisk together the flour, granulated sugar, baking powder, and salt.
- Cut the cold butter into the dry ingredients using a pastry blender or your fingers until the mixture resembles coarse crumbs with some pea-sized pieces of butter remaining.
- In a small bowl, whisk together the 3/4 cup heavy cream, egg, and 1 teaspoon vanilla extract.
- Pour the wet ingredients into the dry ingredients. Mix gently with a fork until just combined. Do not overmix.
- Gently fold in the chopped strawberries. The dough will be shaggy.
- Turn the dough out onto a lightly floured surface. Gently pat the dough into a 3/4-inch thick circle or rectangle. Avoid kneading.
- Cut the dough into 8 wedges or use a round cutter. Place the scones on the prepared baking sheet.
- Brush the tops of the scones lightly with the reserved 2 tablespoons of heavy cream.
- Bake for 15 to 18 minutes, or until the tops are lightly golden brown. Let cool completely on a wire rack.
- To make the glaze, whisk together the powdered sugar, 2 tablespoons milk or cream, and 1/2 teaspoon vanilla extract until smooth. Add more liquid, a half teaspoon at a time, if the glaze is too thick.
- Drizzle the vanilla glaze over the cooled scones. Let the glaze set before serving.
Notes
- For the most tender scones, keep your butter and cream very cold before mixing.
- If you do not have heavy cream, you can substitute whole buttermilk, but reduce the mixing time even further to prevent toughness.
- If using frozen strawberries, do not thaw them; toss them with one teaspoon of flour before adding them to the dough to prevent excess moisture.
- Handle the dough minimally; overworking develops gluten, resulting in tough scones.
Nutrition
- Serving Size: 1 scone
- Calories: 320
- Sugar: 18
- Sodium: 210
- Fat: 16
- Saturated Fat: 10
- Unsaturated Fat: 6
- Trans Fat: 0
- Carbohydrates: 40
- Fiber: 1
- Protein: 5
- Cholesterol: 55