


Oh my goodness, when the summer heat hits and you just can’t turn the oven on for one more second, I have the absolute lifesaver for you! Forget fussy baking; this recipe is all about quick assembly and pure, refreshing flavor. I’m talking about the most glorious, effortlessly tangy, and sweet Raspberry Lemonade Icebox Pie you have ever tasted. I whipped one up last weekend when unexpected guests showed up, and seriously, they thought I spent all afternoon on it!
The secret is it’s a marvelous no-bake dessert. You just mix, pour, chill, and boom—you have the most beautiful, layered summer treat ready to go. The combination of plump raspberries and that zesty lemonade kick is just unbeatable. Trust me, this simple chilled pie is going to be on heavy rotation all season long, just like my old favorite lemon meringue.
Why This Raspberry Lemonade Icebox Pie is Your New Summer Favorite
Honestly, what isn’t to love about a dessert that requires zero actual baking? That’s the beauty of this classic style of easy icebox pie instructions. This pie is designed for ease, which means less time fussing and more time relaxing!
- Zero oven hovering required! It sets up perfectly in the chill of the refrigerator.
- The prep time is ridiculously quick—you’ll have it assembled faster than you can boil water.
- It hits that perfect note: wonderfully sweet but with that beautiful, sharp tartness from the lemonade.
- It’s the ultimate make-ahead dessert—bake the crust early and keep it ready for any last-minute summer gathering.
Gathering Ingredients for Your Raspberry Lemonade Icebox Pie
Alright, let’s get organized! Since this is a no-bake pie, the quality of your pre-made components really shines through, so grab the good stuff. The structure relies on combining the dry crumbs with melted butter, but the real star is that lemony, creamy filling that sets up perfectly in the fridge. Trust me on this one: get the best quality frozen lemonade concentrate you can find—that stuff is concentrated sunshine for this graham cracker crust raspberry lemonade!
For the Graham Cracker Crust
- 1 1/2 cups graham cracker crumbs
- 1/4 cup granulated sugar
- 6 tablespoons unsalted butter, melted
For the Sweet Tart Raspberry Dessert Filling
- 1 (14 ounce) can sweetened condensed milk
- 1/2 cup frozen lemonade concentrate, thawed (make sure it’s truly thawed!)
- 1/4 cup fresh lemon juice
- 1 teaspoon lemon zest
- 1 cup fresh or frozen raspberries, slightly thawed
For the Whipped Cream Topping
- 1 cup heavy whipping cream
- 2 tablespoons powdered sugar
Easy Icebox Pie Instructions: Making the Raspberry Lemonade Icebox Pie
Now that we have our beautiful ingredients lined up, let’s put this masterpiece together! It’s honestly like building with dessert LEGOs, and it’s so satisfying watching it come together. We’ll break this down into four simple stages. Remember, we aren’t turning on the heat for any of this! You can find tons of other fun simple refrigerator pie recipes online, but this one is the best summer treat.
Step 1: Prepare and Chill the Graham Cracker Crust
First things first, we build the foundation. In a medium bowl, dump in those graham cracker crumbs and the 1/4 cup of sugar. Pour in the melted butter—careful, it’s hot! Mix everything with a fork until it looks like wet sand. You want it all moist, not powdery. Press that mixture firmly and evenly into the bottom and up the sides of your 9-inch pie plate. Don’t be shy; really pack it down! Pop that crust into the fridge for just 15 minutes to let it firm up before we fill it.
Step 2: Mix the Lemonade Filling Base
Grab a clean bowl for the star of the show. You need to whisk together the entire can of sweetened condensed milk—get every last bit!—with your thawed lemonade concentrate, fresh lemon juice, and the grated lemon zest. Whisk this until it’s perfectly smooth and homogenous. You’ll notice it starts to thicken up slightly just from the acidity of the lemon juice reacting with the milk; that’s the magic happening!
Step 3: Assemble and Set the Chilled Raspberry Lemonade Dessert
This is where the color comes in! Take your raspberries—I recommend using them only slightly thawed so they don’t instantly dye everything pink—and gently fold them into that zesty lemonade mixture. Don’t stir aggressively; we don’t want mush! Pour this gorgeous filling right over your chilled crust. Now, this is the waiting game, but it’s worth it! Cover it loosely and slide it into the refrigerator for a solid 4 hours, or until the filling is delightfully firm to the touch. This sets our easy icebox pie instructions!

Step 4: Finish with Whipped Cream Topping
Once the pie is fully set, it’s time for the cloud-like finish. Whip that heavy cream with just the 2 tablespoons of powdered sugar until you get stiff peaks—you know, when the peaks stand straight up when you lift the beater. Spread this whipped topping over the completely firm pie. I like to do big swoops with a spatula, but piping looks fancy too! Save a few extra berries for a pretty garnish right before serving.

Tips for the Best No Bake Raspberry Lemonade Dessert
We’ve made the pie, but a true masterpiece needs a few finishing touches! Since this is such a simple no bake raspberry lemonade dessert, these small details really make it shine. The biggest hurdle people face with this kind of pie is usually either a watery filling or the berries bleeding everywhere, but I’ve got the fixes right here!
First, let’s talk raspberries. If you use raspberries that are completely thawed, they turn into jammy mush and bleed that gorgeous red color all through your beautiful pale yellow filling. Yuck! The trick is to use frozen ones, but only let them sit out for about 10 minutes—just enough so they aren’t rock solid when you fold them in gently. This keeps their shape and protects that lovely layer definition.
For that perfect, clean slice? That’s all about patience. You have to let it set for the full four hours in the fridge, minimum. Seriously, don’t cheat that chill time! But for the *best* clean slice, pop the finished pie back into the fridge for about 30 minutes right before you plan to cut into it. It firms it up just enough so your knife glides through instead of dragging the filling.

Now, a little something I learned: while fresh lemon juice is great, the flavor of frozen lemonade concentrate is just unbeatable for this pie. It has that concentrated, almost syrupy quality that balances the sweetness of the condensed milk perfectly. If you only use fresh juice, you have to add a hair more sugar, but trust me, the concentrate is designed for this!“>
Ingredient Notes and Substitutions for Your Raspberry Lemonade Pie recipe
So, what if your pantry isn’t exactly stocked like mine? Don’t panic! This is a flexible little number, although I always preach sticking close to Grandma’s advice, even when freezing is involved. I often get asked if you can swap out the crust ingredients, and the answer is a resounding, “Yes, you certainly can!”
If you aren’t a huge fan of graham crackers, or maybe you just ran out, definitely try substituting them with vanilla wafers. They mash down just as easily, and they give the base a really lovely, buttery flavor profile that plays nicely with the tart filling. You just use the same amount—one and a half cups of crumbs—to match up with the melted butter. It’s a fantastic upgrade for a slightly different take on the lemon cheesecake bar family!
We already talked about using frozen raspberries slightly thawed, but let’s revisit that for a moment. If you absolutely only have fresh raspberries, you can use those, but you must be extra gentle when folding them in. Fresh berries don’t carry that slight icy structure, so they can break down faster. I recommend waiting until the filling is actually poured into the crust before you sprinkle them on top, just to minimize stirring time.
And just to solidify this—since this is a no-bake dessert, we rely on the interaction between the acid (lemon) and the binder (condensed milk) to set everything perfectly. That’s why using the *concentrate* is so important. If you tried to make this using only fresh lemon juice without the concentrate, you’d end up with a thin, sweet, soupy mess that would never firm up. Stick to the recipe ratio for that glorious, creamy texture that defines a true icebox pie!
Storage and Make Ahead Chilled Fruit Pie Guidelines
One of the best parts about whipping up this beautiful make ahead chilled fruit pie is that you aren’t racing against the clock! Since this Raspberry Lemonade Icebox Pie relies entirely on chilling to set, it’s actually better if you make it ahead of time. It gives all those lemon flavors a chance to really marry together in that sweet filling.
You can absolutely make this pie a day ahead of time, which is a massive win when you’re planning a big summer party. I usually assemble the entire thing—crust, filling, and all—and let it chill overnight. Just make sure you keep it tightly covered in the fridge so it doesn’t pick up any strange smells. It keeps beautifully for two, maybe even three days, though honestly, ours never lasts that long!
Now, a critical word of advice: This is a REFRIGERATED pie, not a freezer pie! Do not try to freeze the entire thing. The texture of the whipped cream topping and the condensed milk filling just doesn’t handle the deep freeze well; when it thaws, it can get watery or separate, and we definitely don’t want that. Plus, you can’t reheat it, naturally. If you want to save leftovers, they must stay nestled in the cold compartment of your fridge.
If you are using the whipped cream topping, wait until the day you serve it to add that final flourish. If you put the whipped cream on the night before, it might start to weep a little by the next afternoon. If you wait until just before serving, your topping will be peak fluffiness. But hey, if you’re in a huge rush, you can even sprinkle on a little bit of powdered sugar instead of the cream for easy storage!
Serving Suggestions for This Icebox Dessert Ideas for Parties
Okay, so the hard work is done, your summer raspberry lemonade dessert has set up beautifully, and now it’s time to make it look as spectacular as it tastes! Presentation is everything, especially when you are looking for those show-stopping icebox dessert ideas for parties. You don’t need fancy tools; just a little bit of color contrast goes a long way.
My absolute favorite way to present this pie is by keeping the whipped cream simple—maybe just smooth it over the top—and then focusing on the garnishes. Pile a generous cluster of fresh, bright red raspberries right in the center. It makes the whole pie pop! If you happen to have a little fresh mint on hand, tear a few tiny leaves and scatter them artfully around the edges. That little bit of green against the pink and white is just gorgeous.
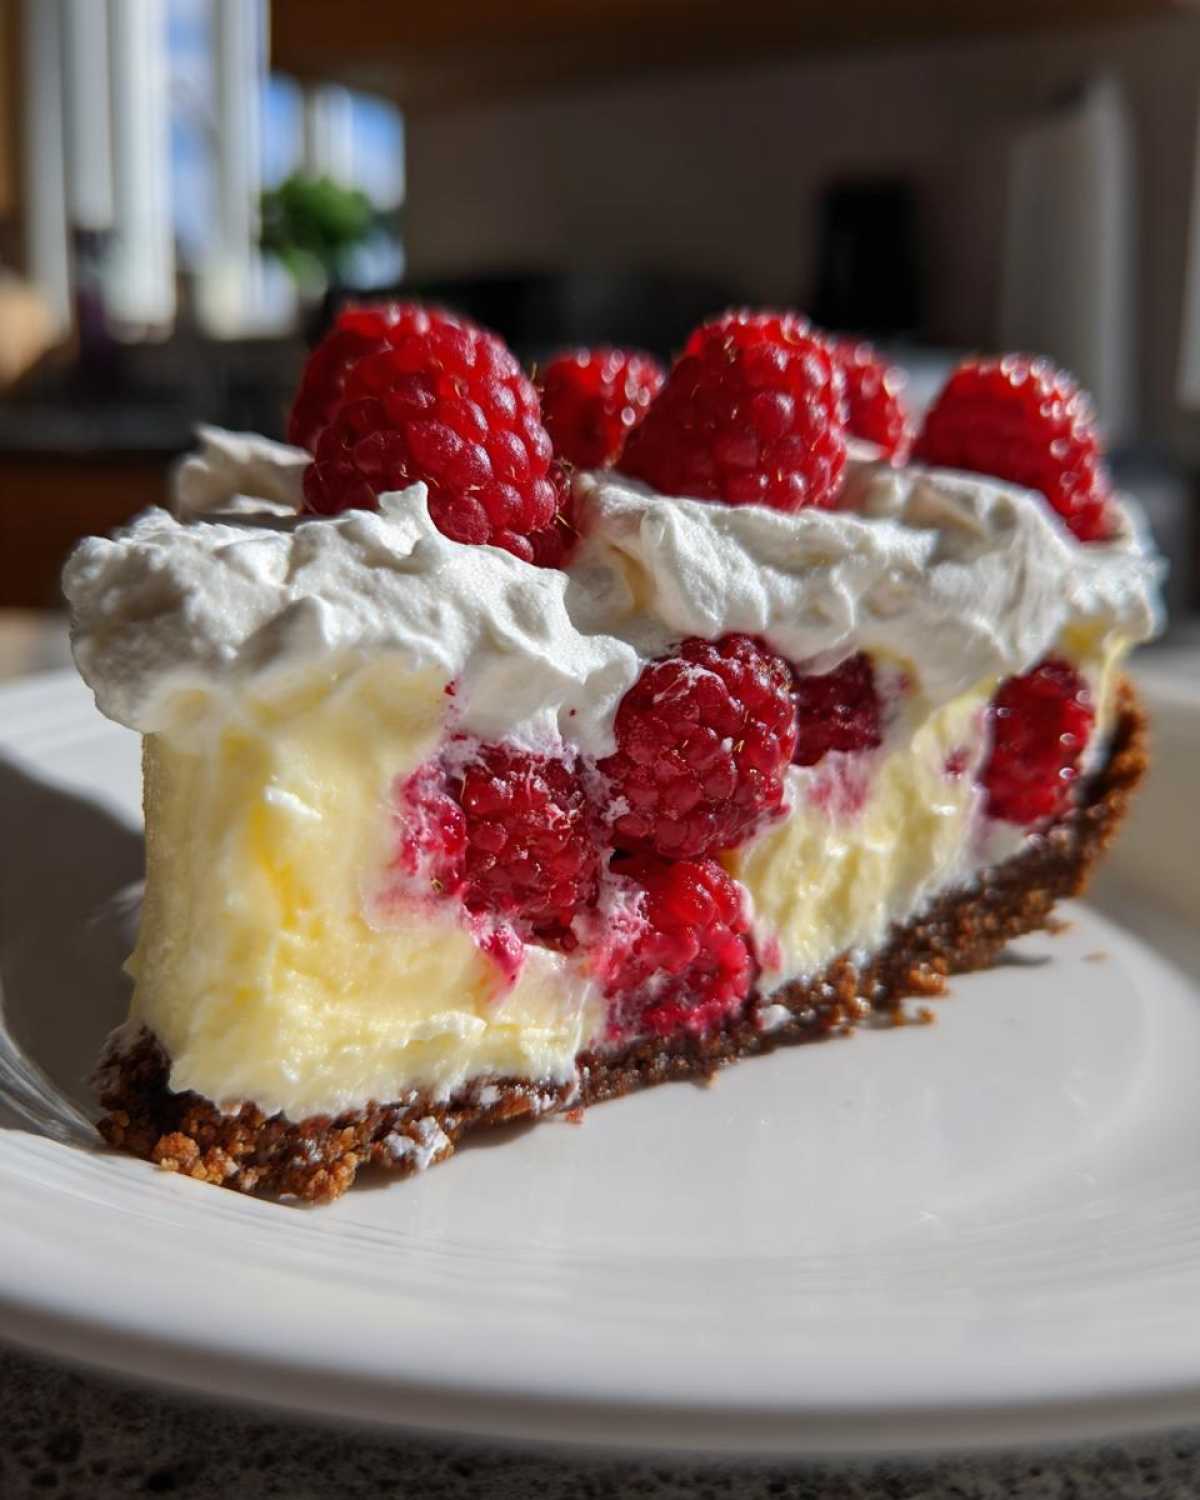
For serving this sweet tart flavor explosion, I like to offer a simple pairing on the side. Because the pie is so bright and tangy, it cuts through heavier flavors beautifully. A really robust, dark roast coffee, served black or with just a splash of cream, is a wonderful counterpoint. If you prefer tea, think simple: a nice, strong Earl Grey or even a slightly chilled, unsweetened black tea works perfectly. You don’t want anything too sugary competing with that beautiful lemonade flavor!
If you managed to save any of that lemon zest from earlier, toss a tiny pinch over the very top right before taking it to the table. It just brightens the whole aroma! Enjoy watching everyone take that first, glorious, no-bake bite!
Frequently Asked Questions About the Raspberry Lemonade Icebox Pie
I always get asked the same things when people try this recipe for the first time, usually because they are so used to baked pies! Honestly, this sweet tart raspberry dessert is so easy, but knowing these little tricks makes it foolproof. I’ve gathered the most common questions right here so you can feel totally confident making your homemade raspberry lemonade pie!
Can I make the filling firmer without baking?
That’s the whole point of an icebox pie! The firmness comes from chemistry, not heat. The acid in the lemon juice reacting with the sweetened condensed milk thickens it up beautifully while chilling—it’s almost like magic. You just need to respect that 4-hour minimum chill time, okay? Now, if you’re determined to get a super-duper firm texture, some folks will stir in a packet of unflavored gelatin that’s been bloomed in a tiny bit of hot water. But beware: that changes the creamy texture slightly, and for me, it stops being a real, classic icebox dessert!
What is the best way to get a clean slice?
I’ve been asked this dozens of times because nobody wants a sloppy slice of dessert! I truly believe the best trick, beyond making sure you let it chill for the full 4 hours, is the final cool-down. Right before you bring this beauty out to serve at your party, just pop the whole thing back into the fridge for an extra 30 minutes. That final chill tightens everything up just enough so your knife goes straight through without smearing that lovely whipped topping or dragging the filling.
Is this recipe essentially a frozen lemonade pie with berries?
That’s a great question! While it is chilling, it’s not quite a *frozen* pie, which usually relies on freezing solid. We want this to be deeply chilled, creamy, and sliceable right from the fridge, not rock hard like ice cream. If you wanted it more frozen, you could definitely use slightly less liquid in the filling or maybe switch to using partially frozen raspberries to lower the temperature. But for the best experience as a no bake raspberry lemonade dessert, keep it happy in the main compartment of your fridge!
Can I use fresh lemons instead of the concentrate?
If you absolutely must skip the concentrate—maybe you only have fresh lemons on hand—you can, but you have to adjust your expectations and your sugar! The concentrate has a specific sweetness and thickness built in. If you switch to using only fresh juice, you will need to likely add another 1/4 cup of powdered sugar (or granulated sugar) to the filling base mixture to compensate for the tartness and help it set. It doesn’t taste quite the same as the classic lemon cream pie with raspberries version, but it’s still delicious!
Nutritional Snapshot of the Homemade Raspberry Lemonade Pie
Now, I’m usually not one to count calories when I’m enjoying a slice of heaven, especially during the summer when treats are practically mandatory! But I know some of you like to keep track, so I took a peek at the general breakdown for this Homemade Raspberry Lemonade Pie. Remember, this is just an estimation, folks. I used standard measuring cups and average store-bought ingredients, so your specific brand of graham crackers or the exact amount of sugar you sprinkle on top might shift things around just a little bit!
This is a rich, sweet, and creamy dessert, thanks to that dense filling and the buttery crust, so keep that in mind when looking at the numbers. But come on, it’s worth every buttery, lemony, raspberry-filled bite, right?
- Serving Size: 1 slice
- Calories: Approximately 350
- Fat: About 18g (with 10g being saturated fat)
- Carbohydrates: Around 45g
- Sugar: Roughly 35g (mostly from the condensed milk and crust)
- Protein: About 5g
- Sodium: 150mg
Take those numbers with a grain of salt pepper, as I always say! This pie isn’t meant to be an everyday snack; it’s a special occasion indulgence, meant to be enjoyed best with friends or family around the patio table. Enjoy it!
PrintRaspberry Lemonade Icebox Pie

A simple, no-bake pie featuring a graham cracker crust filled with a sweet and tart raspberry lemonade cream, set in the refrigerator.
- Prep Time: 20 min
- Cook Time: 0 min
- Total Time: 4 hr 20 min
- Yield: 8 servings
- Category: Dessert
- Method: Chilling
- Cuisine: American
- Diet: Vegetarian
Ingredients
- 1 1/2 cups graham cracker crumbs
- 1/4 cup granulated sugar (for crust)
- 6 tablespoons unsalted butter, melted
- 1 (14 ounce) can sweetened condensed milk
- 1/2 cup frozen lemonade concentrate, thawed
- 1/4 cup fresh lemon juice
- 1 teaspoon lemon zest
- 1 cup fresh or frozen raspberries, slightly thawed
- 1 cup heavy whipping cream
- 2 tablespoons powdered sugar (for topping)
Instructions
- Prepare the crust: Mix graham cracker crumbs, 1/4 cup granulated sugar, and melted butter until combined. Press the mixture firmly into the bottom and up the sides of a 9-inch pie plate. Chill for 15 minutes.
- Make the filling: In a medium bowl, whisk together the sweetened condensed milk, thawed lemonade concentrate, lemon juice, and lemon zest until smooth.
- Gently fold in the raspberries into the lemonade mixture. Pour the filling over the chilled crust.
- Chill the pie for at least 4 hours, or until the filling is firm.
- Prepare the topping: In a separate bowl, whip the heavy cream and 2 tablespoons of powdered sugar until stiff peaks form.
- Spread or pipe the whipped cream over the set pie just before serving. Garnish with extra raspberries if desired.
Notes
- If using frozen raspberries, ensure they are only slightly thawed so they do not bleed too much color into the filling before setting.
- For a cleaner slice, return the finished pie to the refrigerator for 30 minutes before cutting.
- You can substitute vanilla wafers for graham crackers in the crust for a different flavor base.
Nutrition
- Serving Size: 1 slice
- Calories: 350
- Sugar: 35
- Sodium: 150
- Fat: 18
- Saturated Fat: 10
- Unsaturated Fat: 8
- Trans Fat: 0
- Carbohydrates: 45
- Fiber: 1
- Protein: 5
- Cholesterol: 45