

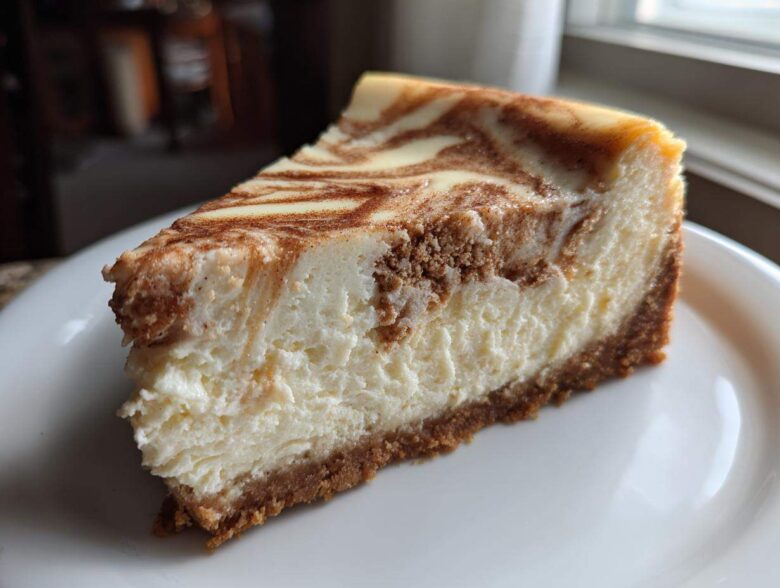
If you haven’t jumped on the dessert mashup train yet, you are seriously missing out! I’m obsessed with combining two amazing things into one show-stopping treat. And honestly, nothing beats the marriage of a soft, spiced cookie and a rich, velvety cheesecake. I’m talking about the snickerdoodle cheesecake, people! It’s the ultimate festive dessert because you get that signature buttery, crackly cinnamon-sugar flavor swirled right into the creamiest filling you can imagine. Trust me on this; the way the spices sink into that cool cream cheese? Pure magic. I just know this recipe will become a holiday tradition at your house, just like it did at mine. We love baking things that make people happy!
Why This Creamy Snickerdoodle Cheesecake is Your Next Holiday Showstopper
I’m telling you, if you need a standout centerpiece for Thanksgiving or Christmas, this is it. Forget boring plain cheesecakes! This recipe delivers that cozy, spiced flavor everyone craves during the cooler months, wrapped up in an incredibly easy bake. This is easily the best holiday cheesecake you’ll ever attempt, even if you’re a cheesecake newbie!
- It brings all that warm nostalgia of snickerdoodles without having to roll a single cookie!
- The texture? Oh my goodness, it’s so smooth. It truly separates this from your average spiced dessert.
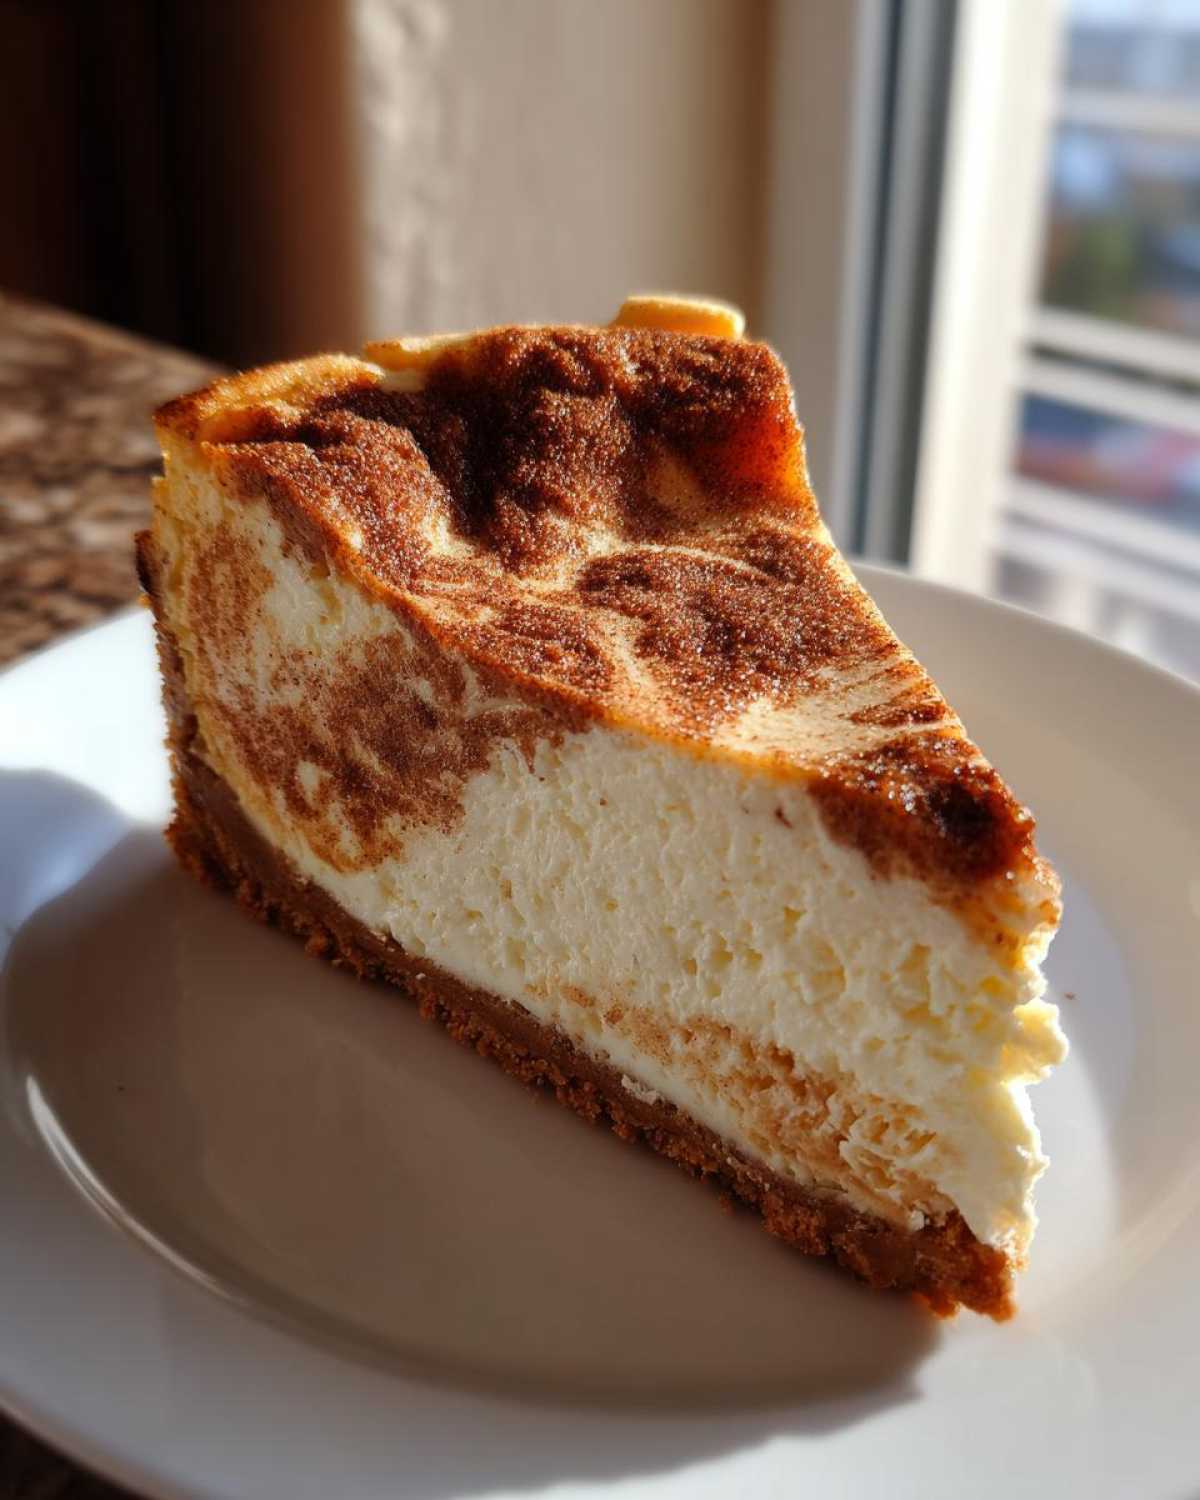
- Plus, it looks gorgeous. That cinnamon swirl makes it a true festive cheesecake bake that everyone will comment on.
The Perfect Two in One Dessert Mashup
Why choose between a chewy cookie and a creamy layered dessert when you can have both? We take the sharp cinnamon spice from the cookie and integrate it deeply into the filling. The way that gorgeous cinnamon swirl melts across the surface as it bakes is just stunning. It hits all the right notes!
Achieving That Velvety Cheesecake Filling
The secret to avoiding cracks and getting that rich, luscious mouthfeel is all in the technique, not extra fussy ingredients. We rely on that gentle water bath when baking—don’t skip that step! Also, using fully softened cream cheese is non-negotiable. When you mix everything carefully, you end up with a true velvety cheesecake filling that just dissolves on your tongue.
Gathering Ingredients for Your Snickerdoodle Cheesecake
Okay, planning is the key to success, right? Especially when we are building something as magnificent as this dessert fusion. You don’t want to get halfway through mixing and realize you are out of eggs. I laid out everything you need below, broken down into three simple groups. Pay close attention to what needs to be softened or melted—that makes a huge difference later on! If you’re organized now, the baking process for this easy cheesecake recipe feels almost effortless.
For the Buttery Cinnamon Crust Recipe
This crust is what gives us that foundational snickerdoodle snap! We need that rich, buttery flavor upfront. Don’t skimp on the cinnamon here; it sets the stage for everything else we do.
- 1 1/2 cups graham cracker crumbs (Use good ones!)
- 1/4 cup granulated sugar
- 1 teaspoon ground cinnamon
- 6 tablespoons unsalted butter, melted
For the Cinnamon Swirl and Velvety Cheesecake Filling
This is where the creamy magic happens! Remember, the cream cheese absolutely must be fully softened—I mean, squishy soft—to get that perfect, lump-free mixture. That little bit of extra flour helps keep our velvety cheesecake filling stable.
- 3 (8 ounce) packages cream cheese, softened
- 1 1/2 cups granulated sugar
- 1/4 cup all-purpose flour
- 1 teaspoon vanilla extract
- 1/2 teaspoon ground cinnamon
- 1/4 teaspoon salt
- 3 large eggs (room temperature is best!)
- 1/2 cup sour cream
- For the Swirl Topping:
- 1/4 cup packed light brown sugar
- 1 teaspoon ground cinnamon (separate bowl for this!)
Step-by-Step Instructions for the Ultimate Snickerdoodle Cheesecake Bake
Alright, buckle up, because this is where we turn those beautiful ingredients into the most incredible creamy baked cheesecake you’ve ever seen. Don’t be intimidated by the steps; they are laid out logically to ensure you get that flawless, crack-free top and perfect texture every single time we make this spiced cheesecake dessert. Taking our time here is our secret weapon!
Preparing the Crust and Oven Setup
First things first, let’s get the oven ready to work for us. Preheat your oven right to 350 degrees F. Now, this next part is crucial if you plan on removing this beauty easily: wrap the outside of your 9-inch springform pan super tightly with heavy-duty aluminum foil. I usually do two or three layers of foil just to be safe against the water bath later!
For the crust, mix your graham cracker crumbs, 1/4 cup granulated sugar, and 1 teaspoon of cinnamon in a bowl. Pour in that melted butter and mix until everything is damp and coated—it should feel like wet sand. Press that mixture firmly and evenly into the bottom of your foil-wrapped base. Then, pop it in the oven for just 10 minutes. Once that’s up, pull it out to cool down while we focus on the filling.
Mixing the Velvety Cheesecake Filling
Time to tackle the filling! You need a large bowl here. Use your electric mixer to beat that fully softened cream cheese until it’s beautifully smooth—no lumps allowed! That’s step one for a proper velvety cheesecake filling.
Next, slowly mix in the 1 1/2 cups of granulated sugar, the flour, the vanilla extract, 1/2 teaspoon of cinnamon, and the salt. Mix it just until it comes together. And I mean *just*! Now, add your three eggs one at a time. Mix on low speed after each egg, only until you see it disappear into the batter. Overmixing the eggs is how we get air bubbles that cause cracks, so be gentle!
Finally, fold in that sour cream until the whole mixture looks uniform and lovely. Stop mixing as soon as it’s smooth!
Assembling and Swirling the Snickerdoodle Cheesecake
This part is so fun! First, prepare your swirl mixture: just whisk the brown sugar and the other 1 teaspoon of cinnamon together in a small bowl and keep it handy. Pour about half of your creamy batter right over that cooled, pre-baked crust. Sprinkle half of your reserved cinnamon-sugar mix evenly over that first layer.
Gently pour the rest of the cheesecake batter on top, and then sprinkle the remaining cinnamon-sugar mixture across the top surface. Grab a butter knife, and this is the artistic part: gently cut the knife through the batter in figure-eight motions. You’re just feathering the cinnamon layer through the top, maybe an inch or so deep. Don’t jab it all the way down to the crust, or you’ll mess up our beautiful crust!
Baking and Cooling Protocol for Flawless Snickerdoodle Cheesecake
This protocol guarantees a perfect bake. Place your foil-wrapped springform pan inside a larger roasting pan. Pour hot water into the roasting pan until the water comes about halfway up the sides of the cheesecake pan—that water bath insulates the sides and guarantees even cooking.
Bake for 60 to 70 minutes. You’ll know it’s ready when the edges look set, but the very, very center still wobbles slightly when you nudge the pan gently. This slight jiggle means moisture is retained!
When the time is up, turn the oven OFF! Don’t pull it out yet. Prop the oven door open just a crack—I usually use a wooden spoon handle—and let the creamy baked cheesecake cool down slowly inside the oven for a full hour. This slow temperature adjustment prevents sudden contraction that causes cracking. After that hour, remove it from the water bath, let it finish cooling on a rack, and then it needs a minimum of 6 hours, but really, overnight, chilling in the fridge before you dare slice into this amazing two in one dessert mashup!
Tips for Success When Making Snickerdoodle Cheesecake
Even the best recipes sometimes need a little nudge, right? When you’re dealing with something as temperamental as a baked cheesecake, a few pro pointers can make the difference between a stunning presentation and, well, a sad, cracked mess. We want that gorgeous, smooth top for our holiday table. Focusing on temperature control and handling the baking environment are the best ways to ensure this cinnamon cream cheese dessert turns out absolutely perfect.
Ingredient Temperature is Key
I need you to listen carefully to this one tip: your cream cheese and your eggs must be at room temperature. I mean it! If your cream cheese is stiff, you are going to end up with small lumps, no matter how long you beat it. Lumps mean uneven baking, and uneven baking is the fast track to a cracked top.
Take your cream cheese out on the counter early in the morning if you plan to bake in the evening. Similarly, room temperature eggs mix in much more smoothly and incorporate better into the batter without causing it to curdle or separate when the sugar hits it. It seems like an extra wait, but trust me, this simple step sets the stage for that wonderfully velvety cheesecake filling.
Water Bath Alternatives for Your Cinnamon Sugar Cheesecake
Okay, I know some people truly hate dealing with foil-wrapped pans and hot water baths—it feels like a hassle, especially when you’re already running behind schedule! If you absolutely cannot use the water bath method for your cinnamon sugar cheesecake, there is an alternative, though I still prefer the moisture protection of the water bath.
If you skip the water bath, you need to drop your oven temperature down to 325 degrees F. This means it will take longer, probably around 75 to 85 minutes instead of the 60 to 70 minutes quoted above. The critical follow-up step is mandatory: regardless of how you bake it, you must cool it slowly in the turned-off oven with the door propped open for that full hour. That gradual cool-down is what keeps our cheesecake singing and crack-free!
Variations on the Snickerdoodle Inspired Treats
I love that this recipe is a foolproof base for a show-stopping cheesecake, but sometimes you want to pivot, right? Maybe you don’t have a springform pan, or perhaps you need something easier to serve at a big party buffet. Don’t worry, we can totally turn this concept into other incredible snickerdoodle inspired treats!
The core flavors—that buttery crust and the spiced cream cheese—are so adaptable. My favorite way to change things up is when I’m making dessert for a huge crowd, which is when I suggest shifting to bars. Bars are easier to cut and serve without worrying about drips or presentation perfection!
Snickerdoodle Cheesecake Bars
If you want cheesecake bars instead of the tall, round cake, you absolutely need to change your pan and watch your baking time closely. Instead of using that 9-inch springform pan, grab a standard 9×13 inch baking dish. Make the crust recipe exactly as written—it will just be much thinner.
Pour the filling over the crust (you might even have a little batter leftover!). Since the layer of filling is much shallower in a 9×13 pan, it won’t need that full 60 to 70 minutes in the oven. You’re probably looking closer to 40 or 45 minutes until the center mostly sets. Remember to bake it at a slightly lower temperature, maybe 325 degrees F, if you aren’t using the water bath, just to keep everything gentle. Slice them once they are completely chilled and you have easy-to-grab squares!
Serving Suggestions for Your Festive Cheesecake Bake
Once you finally get that gorgeous snickerdoodle cheesecake chilled and set—and trust me, waiting those 6 hours is the hardest part—you need to decide how to send it over the top!
Since we already have so much rich spice built into the crust and the swirl, sometimes keeping the topping simple is the best move. A light dusting of powdered sugar is elegant and honors how Grandma used to serve things. But if you’re leaning into the full holiday extravagance, I have a couple of ideas that pair perfectly with that cinnamon flavor.
For something extra gooey, a thin drizzle of good quality caramel sauce is unbelievably delicious. It adds a touch of butterscotch depth that works beautifully with the brown sugar already in the swirl. You are making a truly festive cheesecake bake at this point, so don’t hold back!
If you are serving this during a big meal, especially around Thanksgiving or Christmas when everyone’s digging into pies, try serving a small slice alongside some tart fruit! A tiny scoop of lightly sweetened cranberry sauce or even some fresh, slightly tart raspberries cuts through the richness of the cinnamon cream cheese dessert perfectly. And for drinks? You absolutely need something that isn’t too sweet. I always pair rich desserts like this with something bright, like a spiced punch or even our favorite caramel apple cider mocktail. It just cleanses the palate so you can go back for another bite!
Storage and Reheating Instructions for Snickerdoodle Cheesecake
Now that you’ve managed to successfully bake and (the hardest part) resist eating that stunning snickerdoodle cheesecake immediately, we have to talk about storage. Because this is a decadent, creamy, dairy-heavy dessert, how we treat it after baking is super important for safety and texture preservation.
The absolute golden rule, which I cannot stress enough, is chilling time. Remember when we talked about the slow cool-down in the oven? Well, the fridge is the second cooling stage! You need a minimum of 6 hours of chilling time. Seriously. If you cut into it sooner, the filling will just ooze everywhere, and it won’t have that firm, luxurious texture that makes people think you bought it from a fancy bakery. Overnight is truly the magic number for the best slices.
Once chilled, cover your cheesecake loosely with plastic wrap or foil, making sure not to press it directly onto the top unless you used a super stable glaze. It keeps wonderfully in the refrigerator for up to five days. The cinnamon flavor actually seems to deepen just a little bit the next day—it’s fantastic!
But what about reheating? Honestly, you almost never reheat cheesecake, especially one as rich as this spiced version! We serve it cold, straight from the fridge. Reheating it risks turning that beautiful, velvety filling runny and oily—nobody wants a soup cake, right? So, the best instruction here is: keep it cold!
If, by some miracle, you happen to have leftovers after five days, it’s best to wrap individual slices tightly with plastic wrap and freeze them. They freeze beautifully for up to a month. To serve a frozen slice, just pull it out the night before and let it thaw slowly in the back of the fridge. It comes back perfectly!
Frequently Asked Questions About This Spiced Cheesecake Dessert
You know how baking goes—sometimes the best part is sorting out those little confusing details that pop up when you’re elbow-deep in cream cheese! I’ve gathered the questions I get asked the most about this recipe below. Don’t worry if you have a nervous moment about cracks or chilling times; we’ve got you covered for making sure this spiced cheesecake dessert is a success.
Can I make this snickerdoodle cheesecake without a water bath?
You totally can, but you need to be extra careful with your heat! Remember, the water bath is our insurance policy against surface cracks because it creates this super humid, gentle baking environment. If you decide to skip it, you must lower the oven temperature down to 325 degrees F. We are aiming for a low-and-slow bake because high heat is what makes the edges set too fast and crack the middle.
The baking time will certainly increase when you drop the heat, so plan on checking it closer to the 75 to 85-minute mark. And please, please, please, promise me you’ll still do the slow cooling protocol in the turned-off oven for an hour afterward. That gradual temperature descent is almost as important as the water bath itself when trying to achieve that smooth, velvety cheesecake filling!
How long does the creamy baked cheesecake need to chill?
This is the toughest question because the waiting is agonizing after you’ve baked something that smells that heavenly! But seriously, you need patience here. The absolute minimum chilling time to get those clean slices is six hours. I know that’s a long time when sugar cravings hit!
However, if you want the truly signature texture of this creamy baked cheesecake—firm, completely set, and supremely smooth—you should aim for overnight. When it chills overnight, the starches and fats fully stabilize. Then, when you slice it, those cinnamon swirls stay perfectly defined, and you get that incredibly satisfying, clean wedge!
What makes this a good fall dessert idea?
Honestly, it’s all about those warm spices! Cinnamon runs through the entire recipe—it’s in the crust, it’s blended lightly into the main filling, and it’s concentrated in that gorgeous swirl layer. That earthy, sweet spice profile just screams coziness and harvest time. While it’s amazing for Christmas, the combination of cinnamon and brown sugar makes it the perfect fall dessert idea when you need something more substantial than a pie!
Estimated Nutritional Data for Snickerdoodle Cheesecake
I always feel a little guilty checking the nutrition label on something this ridiculously delicious, but since we’re all about being informed bakers here, I wanted to give you a snapshot based on standard ingredient yields. Please know that these numbers are estimates, okay? If you use low-fat cream cheese or skip the swirl sugar, your count will change!
Also, keep in mind this recipe makes 12 generous slices, and cheesecake is definitely meant to be an indulgence—a real treat for the table, not an everyday snack. Think of all the joy this amazing dessert brings to a holiday gathering!
- Serving Size: 1 slice
- Calories: 450
- Sugar: 35g (That’s where the sweetness comes from!)
- Fat: 28g
- Saturated Fat: 17g
- Carbohydrates: 42g
- Protein: 7g
- Cholesterol: 110mg
See? Totally worth every glorious, cinnamon-sugar-coated bite! Don’t let these numbers stop you from making this spectacular two in one dessert mashup!
Share Your Snickerdoodle Cheesecake Creations
Okay, now comes the best part for me—seeing what you all whip up in your own kitchens! Baking is so much better when we can share the results, isn’t it? I put all my heart into making sure this snickerdoodle cheesecake recipe is as foolproof and delicious as possible, but I absolutely love seeing how your swirl patterns look or what fun toppings you invent!
Once you’ve finally gotten your cheesecake perfectly chilled (seriously, that waiting period is brutal!), please come back here and let me know how it went! Drop a rating—did you give it five stars? Tell me what you thought about that buttery crust or the texture of that velvety cheesecake filling.
If you snap a picture—and you definitely should, because this is a gorgeous cake—tag me online! Seeing your kitchen successes is what keeps me motivated to share these family secrets. Don’t forget to use the recipe hashtag so I can find your posts easily. Happy baking, and I can’t wait to hear all about your gorgeous festive cheesecake bake!
PrintUltimate Creamy Snickerdoodle Cheesecake with Cinnamon Swirl
A rich, creamy baked cheesecake featuring a buttery cinnamon-sugar crust and a distinct cinnamon swirl throughout the filling, inspired by classic snickerdoodle cookies.
- Prep Time: 25 min
- Cook Time: 70 min
- Total Time: 7 hours 35 min
- Yield: 12 servings
- Category: Dessert
- Method: Baking
- Cuisine: American
- Diet: Vegetarian
Ingredients
- 1 1/2 cups graham cracker crumbs
- 1/4 cup granulated sugar
- 1 teaspoon ground cinnamon
- 6 tablespoons unsalted butter, melted
- 3 (8 ounce) packages cream cheese, softened
- 1 1/2 cups granulated sugar
- 1/4 cup all-purpose flour
- 1 teaspoon vanilla extract
- 1/2 teaspoon ground cinnamon
- 1/4 teaspoon salt
- 3 large eggs
- 1/2 cup sour cream
- 1/4 cup packed light brown sugar
- 1 teaspoon ground cinnamon (for swirl)
Instructions
- Preheat your oven to 350 degrees F. Wrap the outside of a 9-inch springform pan tightly with heavy-duty aluminum foil.
- Prepare the crust: In a medium bowl, mix graham cracker crumbs, 1/4 cup granulated sugar, and 1 teaspoon cinnamon. Pour in the melted butter and mix until combined. Press the mixture firmly and evenly into the bottom of the prepared springform pan. Bake for 10 minutes. Remove and let cool slightly.
- Prepare the cinnamon swirl mixture: In a small bowl, combine the brown sugar and 1 teaspoon of cinnamon. Set aside.
- Prepare the cheesecake filling: In a large bowl, beat the softened cream cheese with an electric mixer until smooth. Gradually beat in the 1 1/2 cups granulated sugar, flour, vanilla extract, 1/2 teaspoon cinnamon, and salt until just combined. Do not overmix.
- Beat in the eggs one at a time, mixing on low speed after each addition until just incorporated. Mix in the sour cream until smooth.
- Pour half of the cheesecake batter over the cooled crust. Sprinkle half of the reserved cinnamon-sugar mixture evenly over the batter. Gently pour the remaining cheesecake batter over the top. Sprinkle the remaining cinnamon-sugar mixture over the top.
- Create the swirl: Use a butter knife to gently cut through the batter in figure-eight motions to create a swirl pattern. Do not cut all the way to the bottom crust.
- Place the foil-wrapped springform pan into a larger roasting pan. Pour hot water into the roasting pan until it reaches halfway up the sides of the springform pan (this is a water bath).
- Bake for 60 to 70 minutes, or until the edges are set and the center has a slight jiggle.
- Turn off the oven, prop the door open slightly, and let the cheesecake cool in the oven for 1 hour.
- Remove the cheesecake from the water bath and let it cool completely on a wire rack. Refrigerate for at least 6 hours, or preferably overnight, before serving.
Notes
- For the best texture, ensure your cream cheese is fully softened to room temperature before mixing.
- Use high-quality graham crackers for a flavorful crust.
- If you do not want to use a water bath, bake at 325 degrees F for 75-85 minutes and cool slowly in the turned-off oven.
Nutrition
- Serving Size: 1 slice
- Calories: 450
- Sugar: 35g
- Sodium: 300mg
- Fat: 28g
- Saturated Fat: 17g
- Unsaturated Fat: 11g
- Trans Fat: 0.5g
- Carbohydrates: 42g
- Fiber: 1g
- Protein: 7g
- Cholesterol: 110mg